Preamble
Following on from my article about using XBox Controllers with Arduinos, I wondered if it was possible to actually make an XBox receiver, rather than having to buy one.
Online Tutorials
There are a number of tutorials to follow, a quick google sees to that:
- How to make a homemade Xbox 360 controller wireless receiver for … – an excellent, if rather long and rambling, thread.
- DIY Xbox Controller Receiver for PC – Instructables
- Diy Xbox wireless controller adapter for Pc – Instructables
Procedure
- Get an old RROD XBox 360
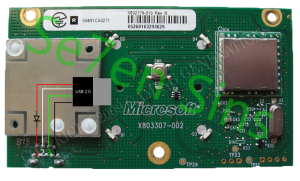
- Pull out the RF Receiver, (image taken from page 5 of the How to make a homemade Xbox 360 controller wireless receiver for PC! guide, which shows how to get the Ring LEDs to light). Note that the Slim XBox is slightly different, see below.

- For a simple USB Conversion – Solder a 5V Zener diode and an old USB plug, like so (image taken from How to make a homemade Xbox 360 controller wireless receiver for PC!)
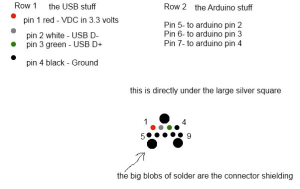
- For an Arduino based setup – This image shows the connections more clearly (image taken from Diy Xbox wireless controller adapter for Pc)
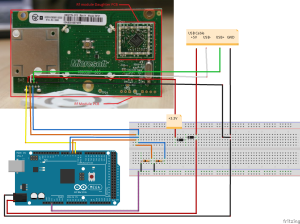
Here is a fritzing diagram (taken from page 14 of the How to make a homemade Xbox 360 controller wireless receiver for PC! guide):
Another method
Here is an alternative method, provided by Robot 9706, using a FTDI MM232R, with I believe allows one to use with both XBox and PC, as well as enabling full control over the LEDs.
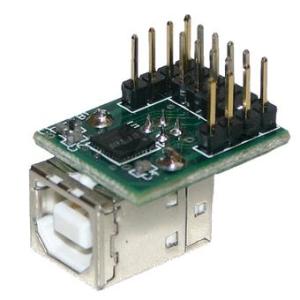
Images taken from page 14 of the How to make a homemade Xbox 360 controller wireless receiver for PC! guide.

The breadboard circuit
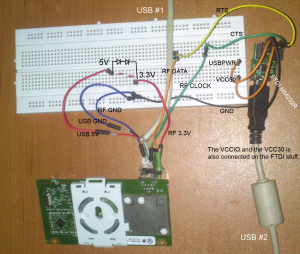
This method comes with a Windows application.

Here is a video showing the complete setup:
Slim XBox 360
The RF receiver from a Slim XBox 360 differs fromt he full fat older type XBox 360. Images taken from page 16 of the How to make a homemade Xbox 360 controller wireless receiver for PC! guide.
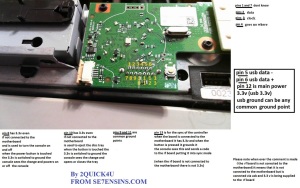
and
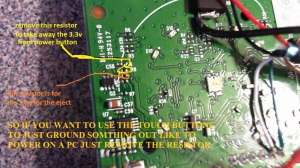
The diode
The diode can be the 1N4001, 1N914 or 1N4148. Basically each diode has a 0.7V drop across it, so, two diodes in series give a 5 – 0.7 – 0.7 = 3.6V which is close to the 3V3 required. Likewise, the Zener Diode is a dirty way of getting from 5V to 3V3.
The best, and safest, way is to use a 3V3 voltage regulator, to make to 5V to 3V3 conversion, as shown of page 16 of the How to make a homemade Xbox 360 controller wireless receiver for PC! guide:
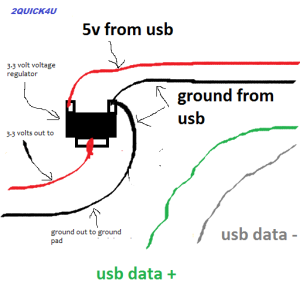
Shown on an RF module from a Slim XBox360, as the board is somewhat different:
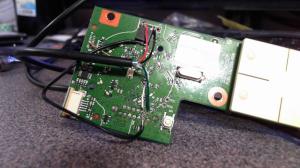
Another photo of the Slim XBox receiver
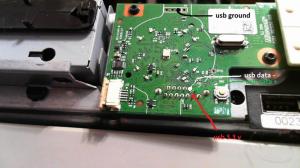
The 3V3 regulator can also be obtained from a dead XBox:


Hi, I have a RF from 360 slim and and I use resistors to drop the voltage 100 ohm and 220 ohm connected like this https://learn.sparkfun.com/tutorials/voltage-dividers and I drop the voltage to ~3.5V. But when I plugged in I don’t see any LED on and it’s not detected by my PC at all.
LikeLike
I think that those resistances could be a little too low and all the current will be draining to GND, rather than powering your RF. Try using 100k and 220k, or 1M and 2.2M. Better still, I, personally, would use a 3.3V voltage regulator.
LikeLike
A resistive voltage divider is not usefull for powering electronics. Most of the times such electronic circuits require low impedance (low equivalent resistance) in their supply path. This is why the voltage regulator method is the best to adapt a 3.3V circuit to a 5V supply! Keep in mind that voltage regulators require capacitors at their input and output terminals to ensure that they are working stable! This information is available in the datasheet of the voltage regulator.
Have fun DIY-ing!
Andrei
LikeLiked by 1 person
So I achieved this without any soldering.
If you strip the outside of a USB 2 plug it’ll slip into the connection the Xbox 360 board used for the RF receiver I just wired the DC converter from the board along the USB cable by stripping a section of the cable and cutting only the +/- leaving data cables untouched. I have it installed and my PC recognises it but I’ll update when I have a controller to test 🙂
LikeLiked by 1 person
So i Need to take the steel plate off my USB and plug It into the reciever connector?
LikeLike
So I got an XBox One and an XBox 360; since all my Xbox 360 Games are playable on the XBox One I can cannibalize the 360 completely. I took the RF module off and noted a USB like port that it connected to. I am wondering if anyone has taken the port off the 360 Motherboard that the RF module connects to, soldered the USB cable lines to it (effectively making a cable with USB on one end and XBox RF port on the other), and plugged it into the port on the RF module? I think this would be a little cleaner that soldering directly to the board and you can remove the cable if need be. I ask because I cannot find a diagram showing where you would solder the lines on the port if you wanted to go this route, I am thinking it would be a mirror image of soldering to the board.
LikeLiked by 1 person
with the risk you apply the USB 5volt directly, this has been the reason not to do so. (and it makes the module thicker than needed, not usefull as I want to make it into a single small box with a raspberry-pi, which directly let me access the 3v3 Data and Clock lines also…)
LikeLike
This also works for the Xbox360 E model and you do not need the power button or eject board.
LikeLike
I am trying to use a Xbox 360 slims power button to power on a pc but I have followed the steps of removing the resistor from the R8 slot and have soldiered some wire from the pc to the 8th pin and they 11th pin on the diagram above where it shows what all the different pins do.
LikeLike
Hi there! I have a dead Xbox 360 Slim, and I’d like to know if there is any 3v3 regulator that I could rip off from the mainboard for the RF receiver. If none is available I might try the diode path.
LikeLike
There are, I cant tell you now which or where thr are, but google the numbers on SOT-223 like packages along with the word datasheet and it will likely tell in the results what it is, without having to click through.
I just wanted to reply with the following thought: Are you going to use it with something else than a PC, then chances are you can source 3v3 from that device very easily. For example the raspberry-pi can supply the 3v3
LikeLike
For the 360 slim, do i just solder a USB 2.0 wire as per the terminals shown in the picture above? with a 5.1V zener diode soldered between those connections… or do i need to take another approach?
LikeLike