
Preamble
I was watching youtube tutorials, and saw this video.
Arduino Tutorial #14: Leonardo as Mouse
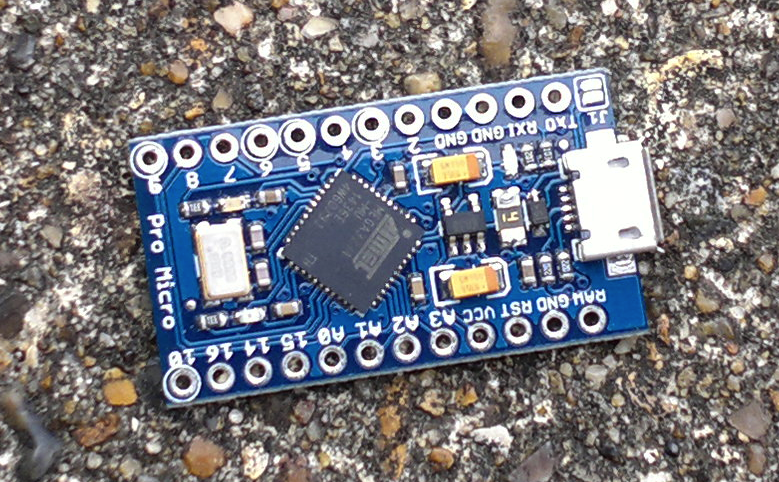
This immediately appealed to my mischievous side, and I ordered a 3.3 V Pro Micro.
However, I digress… That part of the story, the prologue, if you will, is covered more fully in USB Shenanigans. However, this blog, The case of the broken Pro Micro, will deal will repairing an apparently bricked Pro Micro, which resulted due to the shenanigans…
The breakage
The Pro Micro arrived, I opened the package, plugged it into my MacBook Pro. It was recognised, which was a plus as usually OS X is very fussy about Arduino boards. Boards with the USB interface implemented with CH340 chips are just not seen, and unfortunately, a lot of Chinese clones use this IC in lieu of the standard FTDI chip.
Anyway, as it was recognised, I opened up the sketch outlined in USB Shenanigans, selected Arduino Micro in the Tools->Board menu, and uploaded the code. However, it failed to do what I expected to, there were no random mouse movements, nothing. In addition, rather worryingly, all of the three LEDs (PWR, Tx and Rx) were on permanently.

The device seemed bricked, as it no longer showed up in the Tools->Port menu. Plugging it in to my trusty PC laptop didn’t help. It just wasn’t recognised. I got the “USB device unrecognised” popup message from the system tray.
Panic started to set in. A lot of googling “bricked Micro Pro” ensued.
The debugging
A lot of people seem to be suffering the same fate. Evidently, it is very easy to brick these.
The StackExchange Arduino site had a handy question, Arduino Pro Micro clone not recognized, flickering RX LED, which, while not exactly the same issue as I was having, led me to the two following sites:
The Sparkfun Troubleshooting and FAQ for the Micro is very informative. The Micro can be put into bootloader mode by quickly resetting the device twice. A reset is achieved by grounding the RST pin. The easiest way of doing this is by adding a tact switch between GND and RST.
You will also need the Arduino Addon Files which are available on the Pro Micro – 3.3V/8MHz page. Without these you can not select the correct board within the Arduino IDE. Out of the box, the IDE just doesn’t have the additional files required to support uploading the correct code to the 3.3 Pro Micro. After installation you should see the correct board listed in the Tools->Board menu.
This was my mistake, as I had obviously used the wrong board (the 5V in lieu of the 3.3V) to upload the code. The Sparkfun FAQ explains:
The most common source of Pro Micro “bricking” is uploading code to it with an incorrectly set board (e.g. programming a 16MHz/5V Pro Micro with the board set to 8MHz/3.3V). Also, make sure your sketch doesn’t mess with the ATmega32U4’s PLLCSR register, or any other register that sets up USB functionality on the ATmega32U4. The Pro Micro will actually take code compiled for the wrong operating speed, but when it tries to re-enumerate, you’ll be greeted with a notification “USB device not recognised”
One can, apparently, also enter bootloader mode by powering on the Micro whilst holding the RESET button down, but this didn’t seem to work for me, although I am willing to give any rumoured remedy a go.
kwan-137 also has some excellent detailed instructions on how to revive a bricked Pro Micro, again on the Sparkfun Pro Micro page
Get the driver zip mentioned in the “Getting Started Guide”. Copy the single file within it to c:\windows\inf, it will ask for administrator permission to do so.
From the same page, get the Arduino addon files and install them as instructed. Start Arduino, go to File/Preferences and turn on “Show verbose output for: ” for both compilation and upload.
Connect a jumper wire to one of the gnd pins and be ready to touch the other end to the rst pin. For me, I just slid the end of the jumper wire into the gnd hole and held it in place diagonally so it was touching, then touched the other end to the rst hole as needed.
I did this first, but I don’t know if it is necessary. I plugged the board into USB, heard the USB connect bing (low note followed by high), then about 7 seconds later, got a USB malfunction message and a USB disconnect bing (high note followed by low). During that 7 seconds, the part was recognized in the Device Manager as a Sparkfun Pro Micro.
Now for the final step: Start Arduino, select Sparkfun Pro Micro 3.3V, and double-tap the reset pin. During the 7 seconds, you should be able to select the correct serial port in Tools/Serial port. Now load an example sketch, I selected File/Examples/04.Communication/ASCIITable which just uses the USB serial port, no other hardware or D13 light needed. Push the upload button, then watch the status window. It will do something to the effect of
PORTS {COM7, } / {COM7, } => {} PORTS {COM7, } / {COM7, } => {} PORTS {COM7, } / {COM7, } => {}
a lot, maybe 15-20 times in about 4-5 seconds. Towards the end of that time, double-tap the reset pin. If it works, avrdude will print a lot of text, report success, and the part will work normally from then on. Too late on the double-tap and it will not find the device, too early and the 7-second window will expire before avrdude gets into contact with the bootloader and holds the window open.
Here’s what I think is happening: I have seen notes on the net to the effect that a poorly behaving sketch can effectively crash or block the USB driver in the device, and never let the bootloader do its work. The reset double-tap forces the bootloader to start, wait 7 seconds before starting the user sketch, and if Arduino starts a sketch upload during that time, then things work normally. Outside of that window the broken user sketch blocks things. So, the question then becomes, how did a bad sketch get into the part in the first place? I had this trouble with a part fresh from Sparkfun, which I had never put a sketch on.
Hope this helps someone out there…
I tried this the other night, for a couple of hours, trying to get the timing right, but with no success. I do not get the additional COM port appearing within the 8 seconds that the bootloader is operative. The Micro certainly appears to go into bootloader mode (the TX and RX lights stay off), but not a lot else happens. I have the IDE in verbose mode, and get a lot of messages, but those messages are the same whether the Pro Micro is connected or not:
Sketch uses 4,788 bytes (16%) of program storage space. Maximum is 28,672 bytes.
Global variables use 151 bytes of dynamic memory.
Forcing reset using 1200bps open/close on port COM3
PORTS {COM3, } / {COM3, } => {}
PORTS {COM3, } / {COM3, } => {}
PORTS {COM3, } / {COM3, } => {}
PORTS {COM3, } / {COM3, } => {}
PORTS {COM3, } / {COM3, } => {}
PORTS {COM3, } / {COM3, } => {}
PORTS {COM3, } / {COM3, } => {}
PORTS {COM3, } / {COM3, } => {}
PORTS {COM3, } / {COM3, } => {}
PORTS {COM3, } / {COM3, } => {}
PORTS {COM3, } / {COM3, } => {}
PORTS {COM3, } / {COM3, } => {}
PORTS {COM3, } / {COM3, } => {}
PORTS {COM3, } / {COM3, } => {}
PORTS {COM3, } / {COM3, } => {}
PORTS {COM3, } / {COM3, } => {}
PORTS {COM3, } / {COM3, } => {}
PORTS {COM3, } / {COM3, } => {}
PORTS {COM3, } / {COM3, } => {}
PORTS {COM3, } / {COM3, } => {}
Uploading using selected port: COM3
C:\Program Files\Arduino\hardware\tools\avr/bin/avrdude -CC:\Program Files\Arduino\hardware\tools\avr/etc/avrdude.conf -v -patmega32u4 -cavr109 -PCOM3 -b57600 -D -Uflash:w:C:\Users\davinci\AppData\Local\Temp\build8071801802790727777.tmp/Blink.cpp.hex:i

avrdude: Version 6.0.1, compiled on Apr 15 2015 at 19:59:58
Copyright (c) 2000-2005 Brian Dean, http://www.bdmicro.com/
Copyright (c) 2007-2009 Joerg Wunsch

System wide configuration file is "C:\Program Files\Arduino\hardware\tools\avr/etc/avrdude.conf"

Using Port : COM3
Using Programmer : avr109
Overriding Baud Rate : 57600
AVR Part : ATmega32U4
Chip Erase delay : 9000 us
PAGEL : PD7
BS2 : PA0
RESET disposition : dedicated
RETRY pulse : SCK
serial program mode : yes
parallel program mode : yes
Timeout : 200
StabDelay : 100
CmdexeDelay : 25
SyncLoops : 32
ByteDelay : 0
PollIndex : 3
PollValue : 0x53
Memory Detail :

Block Poll Page Polled
Memory Type Mode Delay Size Indx Paged Size Size #Pages MinW MaxW ReadBack
----------- ---- ----- ----- ---- ------ ------ ---- ------ ----- ----- ---------
eeprom 65 20 4 0 no 1024 4 0 9000 9000 0x00 0x00
flash 65 6 128 0 yes 32768 128 256 4500 4500 0x00 0x00
lfuse 0 0 0 0 no 1 0 0 9000 9000 0x00 0x00
hfuse 0 0 0 0 no 1 0 0 9000 9000 0x00 0x00
efuse 0 0 0 0 no 1 0 0 9000 9000 0x00 0x00
lock 0 0 0 0 no 1 0 0 9000 9000 0x00 0x00
calibration 0 0 0 0 no 1 0 0 0 0 0x00 0x00
signature 0 0 0 0 no 3 0 0 0 0 0x00 0x00

Programmer Type : butterfly
Description : Atmel AppNote AVR109 Boot Loader

Connecting to programmer: .
avrdude: butterfly_recv(): programmer is not responding
I think that I will have to try with the more painful USBasp route. But that can wait another day…
UPDATE
I tried the USBasp, after remembering to set the jumper to 3.3V, and got the following error:
Arduino: 1.6.4 (Windows 7), Board: "SparkFun Pro Micro 3.3V/8MHz"

Error while burning bootloader: missing 'bootloader.tool' configuration parameter
Looking that error message up on google, I came across this thread, “missing ‘bootloader.tool’ configuration” error when trying to burn bootloader. The relevant information here is:
Looks like the SparkFun folks put the “bootloader.tool=avrdude” line in for the 16 MHz Pro Micro but not for the 8 MHz Pro Micro. You should be able to edit the boards.txt file to fix the problem.
This is indeed the case, as opening up the
boards.txt
file, which is part of the Sparkfun files, that are stored in the Arduino directory under the users home directory,
C:\Users\davinci\Documents\Arduino\hardware\sparkfun\avr\boards.txt
shows:
menu.cpu=Processor

##############################################################

promicro16.name=SparkFun Pro Micro 5V/16MHz
promicro16.build.board=AVR_PROMICRO16
promicro16.build.vid.0=0x1B4F
promicro16.build.pid.0=0x9205
promicro16.build.vid.1=0x1B4F
promicro16.build.pid.1=0x9206

promicro16.upload.tool=avrdude
promicro16.upload.protocol=avr109
promicro16.upload.maximum_size=28672
promicro16.upload.data_size=2560
promicro16.upload.speed=57600
promicro16.upload.disable_flushing=true
promicro16.upload.use_1200bps_touch=true
promicro16.upload.wait_for_upload_port=true

promicro16.bootloader.tool=avrdude
promicro16.bootloader.low_fuses=0xff
promicro16.bootloader.high_fuses=0xd8
promicro16.bootloader.extended_fuses=0xcb
promicro16.bootloader.file=caterina/Caterina-promicro16.hex
promicro16.bootloader.unlock_bits=0x3F
promicro16.bootloader.lock_bits=0x2F

promicro16.build.mcu=atmega32u4
promicro16.build.f_cpu=16000000L
promicro16.build.vid=0x1B4F
promicro16.build.pid=0x9206
promicro16.build.usb_product="SparkFun Pro Micro"
promicro16.build.core=arduino:arduino
promicro16.build.variant=promicro
promicro16.build.extra_flags={build.usb_flags}

##############################################################

promicro8.name=SparkFun Pro Micro 3.3V/8MHz
promicro8.build.board=AVR_PROMICRO8
promicro8.build.vid.0=0x1B4F
promicro8.build.pid.0=0x9203
promicro8.build.vid.1=0x1B4F
promicro8.build.pid.1=0x9204

promicro8.upload.tool=avrdude
promicro8.upload.protocol=avr109
promicro8.upload.maximum_size=28672
promicro8.upload.speed=57600
promicro8.upload.disable_flushing=true
promicro8.upload.use_1200bps_touch=true
promicro8.upload.wait_for_upload_port=true

promicro8.bootloader.low_fuses=0xff
promicro8.bootloader.high_fuses=0xd8
promicro8.bootloader.extended_fuses=0xfe
promicro8.bootloader.file=caterina/Caterina-promicro8.hex
promicro8.bootloader.unlock_bits=0x3F
promicro8.bootloader.lock_bits=0x2F

promicro8.build.mcu=atmega32u4
promicro8.build.f_cpu=8000000L
promicro8.build.vid=0x1B4F
promicro8.build.pid=0x9204
promicro8.build.usb_product="SparkFun Pro Micro"
promicro8.build.core=arduino:arduino
promicro8.build.variant=promicro
promicro8.build.extra_flags={build.usb_flags}

##############################################################

fiov3.name=SparkFun Fio V3 3.3V/8MHz
fiov3.build.board=AVR_FIOV3
fiov3.build.vid.0=0x1B4F
fiov3.build.pid.0=0xF100
fiov3.build.vid.1=0x1B4F
fiov3.build.pid.1=0xF101

fiov3.upload.tool=avrdude
fiov3.upload.protocol=avr109
fiov3.upload.maximum_size=28672
fiov3.upload.speed=57600
fiov3.upload.disable_flushing=true
fiov3.upload.use_1200bps_touch=true
fiov3.upload.wait_for_upload_port=true

fiov3.bootloader.low_fuses=0xff
fiov3.bootloader.high_fuses=0xd8
fiov3.bootloader.extended_fuses=0xfe
fiov3.bootloader.file=caterina/Caterina-fio.hex
fiov3.bootloader.unlock_bits=0x3F
fiov3.bootloader.lock_bits=0x2F

fiov3.build.mcu=atmega32u4
fiov3.build.f_cpu=8000000L
fiov3.build.vid=0x1B4F
fiov3.build.pid=0xF101
fiov3.build.usb_product="SparkFun Fio v3"
fiov3.build.core=arduino:arduino
fiov3.build.variant=promicro
fiov3.build.extra_flags={build.usb_flags}

##############################################################

makeymakey.name=SparkFun Makey Makey
makeymakey.build.board=AVR_MAKEYMAKEY
makeymakey.build.vid.0=0x1B4F
makeymakey.build.pid.0=0x2B74
makeymakey.build.vid.1=0x1B4F
makeymakey.build.pid.1=0x2B75

makeymakey.upload.tool=avrdude
makeymakey.upload.protocol=avr109
makeymakey.upload.maximum_size=28672
makeymakey.upload.speed=57600
makeymakey.upload.disable_flushing=true
makeymakey.upload.use_1200bps_touch=true
makeymakey.upload.wait_for_upload_port=true

makeymakey.bootloader.low_fuses=0xff
makeymakey.bootloader.high_fuses=0xd8
makeymakey.bootloader.extended_fuses=0xcb
makeymakey.bootloader.file=caterina/Caterina-makey.hex
makeymakey.bootloader.unlock_bits=0x3F
makeymakey.bootloader.lock_bits=0x2F

makeymakey.build.mcu=atmega32u4
makeymakey.build.f_cpu=16000000L
makeymakey.build.vid=0x1B4F
makeymakey.build.pid=0x2B75
makeymakey.build.usb_product="SparkFun MaKey"
makeymakey.build.core=arduino:arduino
makeymakey.build.variant=promicro
makeymakey.build.extra_flags={build.usb_flags}
Modifying the file to add the line
promicro8.bootloader.tool=avrdude
, so that the file now looks like
menu.cpu=Processor

##############################################################

promicro16.name=SparkFun Pro Micro 5V/16MHz
promicro16.build.board=AVR_PROMICRO16
promicro16.build.vid.0=0x1B4F
promicro16.build.pid.0=0x9205
promicro16.build.vid.1=0x1B4F
promicro16.build.pid.1=0x9206

promicro16.upload.tool=avrdude
promicro16.upload.protocol=avr109
promicro16.upload.maximum_size=28672
promicro16.upload.data_size=2560
promicro16.upload.speed=57600
promicro16.upload.disable_flushing=true
promicro16.upload.use_1200bps_touch=true
promicro16.upload.wait_for_upload_port=true

promicro16.bootloader.tool=avrdude
promicro16.bootloader.low_fuses=0xff
promicro16.bootloader.high_fuses=0xd8
promicro16.bootloader.extended_fuses=0xcb
promicro16.bootloader.file=caterina/Caterina-promicro16.hex
promicro16.bootloader.unlock_bits=0x3F
promicro16.bootloader.lock_bits=0x2F

promicro16.build.mcu=atmega32u4
promicro16.build.f_cpu=16000000L
promicro16.build.vid=0x1B4F
promicro16.build.pid=0x9206
promicro16.build.usb_product="SparkFun Pro Micro"
promicro16.build.core=arduino:arduino
promicro16.build.variant=promicro
promicro16.build.extra_flags={build.usb_flags}

##############################################################

promicro8.name=SparkFun Pro Micro 3.3V/8MHz
promicro8.build.board=AVR_PROMICRO8
promicro8.build.vid.0=0x1B4F
promicro8.build.pid.0=0x9203
promicro8.build.vid.1=0x1B4F
promicro8.build.pid.1=0x9204

promicro8.upload.tool=avrdude
promicro8.upload.protocol=avr109
promicro8.upload.maximum_size=28672
promicro8.upload.speed=57600
promicro8.upload.disable_flushing=true
promicro8.upload.use_1200bps_touch=true
promicro8.upload.wait_for_upload_port=true

promicro8.bootloader.tool=avrdude
promicro8.bootloader.low_fuses=0xff
promicro8.bootloader.high_fuses=0xd8
promicro8.bootloader.extended_fuses=0xfe
promicro8.bootloader.file=caterina/Caterina-promicro8.hex
promicro8.bootloader.unlock_bits=0x3F
promicro8.bootloader.lock_bits=0x2F

promicro8.build.mcu=atmega32u4
promicro8.build.f_cpu=8000000L
promicro8.build.vid=0x1B4F
promicro8.build.pid=0x9204
promicro8.build.usb_product="SparkFun Pro Micro"
promicro8.build.core=arduino:arduino
promicro8.build.variant=promicro
promicro8.build.extra_flags={build.usb_flags}

##############################################################

fiov3.name=SparkFun Fio V3 3.3V/8MHz
fiov3.build.board=AVR_FIOV3
fiov3.build.vid.0=0x1B4F
fiov3.build.pid.0=0xF100
fiov3.build.vid.1=0x1B4F
fiov3.build.pid.1=0xF101

fiov3.upload.tool=avrdude
fiov3.upload.protocol=avr109
fiov3.upload.maximum_size=28672
fiov3.upload.speed=57600
fiov3.upload.disable_flushing=true
fiov3.upload.use_1200bps_touch=true
fiov3.upload.wait_for_upload_port=true

fiov3.bootloader.low_fuses=0xff
fiov3.bootloader.high_fuses=0xd8
fiov3.bootloader.extended_fuses=0xfe
fiov3.bootloader.file=caterina/Caterina-fio.hex
fiov3.bootloader.unlock_bits=0x3F
fiov3.bootloader.lock_bits=0x2F

fiov3.build.mcu=atmega32u4
fiov3.build.f_cpu=8000000L
fiov3.build.vid=0x1B4F
fiov3.build.pid=0xF101
fiov3.build.usb_product="SparkFun Fio v3"
fiov3.build.core=arduino:arduino
fiov3.build.variant=promicro
fiov3.build.extra_flags={build.usb_flags}

##############################################################

makeymakey.name=SparkFun Makey Makey
makeymakey.build.board=AVR_MAKEYMAKEY
makeymakey.build.vid.0=0x1B4F
makeymakey.build.pid.0=0x2B74
makeymakey.build.vid.1=0x1B4F
makeymakey.build.pid.1=0x2B75

makeymakey.upload.tool=avrdude
makeymakey.upload.protocol=avr109
makeymakey.upload.maximum_size=28672
makeymakey.upload.speed=57600
makeymakey.upload.disable_flushing=true
makeymakey.upload.use_1200bps_touch=true
makeymakey.upload.wait_for_upload_port=true

makeymakey.bootloader.low_fuses=0xff
makeymakey.bootloader.high_fuses=0xd8
makeymakey.bootloader.extended_fuses=0xcb
makeymakey.bootloader.file=caterina/Caterina-makey.hex
makeymakey.bootloader.unlock_bits=0x3F
makeymakey.bootloader.lock_bits=0x2F

makeymakey.build.mcu=atmega32u4
makeymakey.build.f_cpu=16000000L
makeymakey.build.vid=0x1B4F
makeymakey.build.pid=0x2B75
makeymakey.build.usb_product="SparkFun MaKey"
makeymakey.build.core=arduino:arduino
makeymakey.build.variant=promicro
makeymakey.build.extra_flags={build.usb_flags}
Now, when I burn the bootloader, this had the effect of turning off the two Rx and Tx LEDs, leaving only the PWR red LED, so that operation appears to have been returned to normal. However, a content mismatch error is returned:
Arduino: 1.6.4 (Windows 7), Board: "SparkFun Pro Micro 3.3V/8MHz"

C:\Program Files\Arduino\hardware\tools\avr/bin/avrdude -CC:\Program Files\Arduino\hardware\tools\avr/etc/avrdude.conf -v -patmega32u4 -cusbasp -Pusb -e -Ulock:w:0x3F:m -Uefuse:w:0xfe:m -Uhfuse:w:0xd8:m -Ulfuse:w:0xff:m


avrdude: Version 6.0.1, compiled on Apr 15 2015 at 19:59:58

         Copyright (c) 2000-2005 Brian Dean, http://www.bdmicro.com/

         Copyright (c) 2007-2009 Joerg Wunsch


         System wide configuration file is "C:\Program Files\Arduino\hardware\tools\avr/etc/avrdude.conf"


         Using Port                    : usb

         Using Programmer              : usbasp

         AVR Part                      : ATmega32U4

         Chip Erase delay              : 9000 us

         PAGEL                         : PD7

         BS2                           : PA0

         RESET disposition             : dedicated

         RETRY pulse                   : SCK

         serial program mode           : yes

         parallel program mode         : yes

         Timeout                       : 200

         StabDelay                     : 100

         CmdexeDelay                   : 25

         SyncLoops                     : 32

         ByteDelay                     : 0

         PollIndex                     : 3

         PollValue                     : 0x53

         Memory Detail                 :


                                  Block Poll               Page                       Polled

           Memory Type Mode Delay Size  Indx Paged  Size   Size #Pages MinW  MaxW   ReadBack

           ----------- ---- ----- ----- ---- ------ ------ ---- ------ ----- ----- ---------

           eeprom        65    20     4    0 no       1024    4      0  9000  9000 0x00 0x00

           flash         65     6   128    0 yes     32768  128    256  4500  4500 0x00 0x00

           lfuse          0     0     0    0 no          1    0      0  9000  9000 0x00 0x00

           hfuse          0     0     0    0 no          1    0      0  9000  9000 0x00 0x00

           efuse          0     0     0    0 no          1    0      0  9000  9000 0x00 0x00

           lock           0     0     0    0 no          1    0      0  9000  9000 0x00 0x00

           calibration    0     0     0    0 no          1    0      0     0     0 0x00 0x00

           signature      0     0     0    0 no          3    0      0     0     0 0x00 0x00


         Programmer Type : usbasp

         Description     : USBasp, http://www.fischl.de/usbasp/


avrdude: auto set sck period (because given equals null)

avrdude: warning: cannot set sck period. please check for usbasp firmware update.

avrdude: AVR device initialized and ready to accept instructions


Reading | ################################################## | 100% 0.01s


avrdude: Device signature = 0x1e9587

avrdude: erasing chip

avrdude: auto set sck period (because given equals null)

avrdude: warning: cannot set sck period. please check for usbasp firmware update.

avrdude: reading input file "0x3F"

avrdude: writing lock (1 bytes):


Writing | ################################################## | 100% 0.00s


avrdude: 1 bytes of lock written

avrdude: verifying lock memory against 0x3F:

avrdude: load data lock data from input file 0x3F:

avrdude: input file 0x3F contains 1 bytes

avrdude: reading on-chip lock data:


Reading | ################################################## | 100% 0.00s


avrdude: verifying ...

avrdude: 1 bytes of lock verified

avrdude: reading input file "0xfe"

avrdude: writing efuse (1 bytes):


Writing | ################################################## | 100% 0.03s


avrdude: 1 bytes of efuse written

avrdude: verifying efuse memory against 0xfe:

avrdude: load data efuse data from input file 0xfe:

avrdude: input file 0xfe contains 1 bytes

avrdude: reading on-chip efuse data:


Reading | ################################################## | 100% 0.00s


avrdude: verifying ...

avrdude: 1 bytes of efuse verified

avrdude: reading input file "0xd8"

avrdude: writing hfuse (1 bytes):


Error while burning bootloader.

Writing |  ***failed;

################################################## | 100% 0.08s


avrdude: 1 bytes of hfuse written

avrdude: verifying hfuse memory against 0xd8:

avrdude: load data hfuse data from input file 0xd8:

avrdude: input file 0xd8 contains 1 bytes

avrdude: reading on-chip hfuse data:


Reading | ################################################## | 100% 0.00s


avrdude: verifying ...

avrdude: verification error, first mismatch at byte 0x0000

         0x00 != 0xd8

avrdude: verification error; content mismatch


avrdude done.  Thank you.
Plugging the Pro Micro back into the MacBook Pro as a test, seeing as, like I said above, the Mac is the most fussy, unfortunately shown that Pro Micro was not recognised, and no entry appeared in the Port menu.
A question on Stack Exchange, nothing really new here – Arduino Pro Micro Communication Issues
Reprise
This issue was revisited one year later… see The case of the broken Pro Micro (reprise) for the happy conclusion.

Hi, i have a similar problema with my pro micro board. the RX is turned on all the time. my pc don’t recognized the device. I need help pls
LikeLike
Thank you so much, thought I had bricked two Pro Micros. Got to the reset state but couldn’t upload the script I wanted. But uploading one of the Example ones during the 8 seconds worked for me. Then more stable and able to upload my sketch. I appreciate your comprehensive instructions.
LikeLike