

Preamble
Putting together a P3Steel [v4] kit… There is no hard and fast assembly manual, so here is a collection of guides and video tutorials.
For other P3Steel construction videos, see:
See also Prusa i3 Construction videos.
P3Steel v.4 parts
This is a plan of the parts

Review of frame
Review of the P3Steel: MakerGal – Review marco P3steel V4
Preparation
Prior to assembly, it is necessary to paint the frame parts:
- P3Steel Build Log (#02) – Preparing and Painting the Frame
- RepRap wiki – P3Steel Steel Frame Parts Painting
Painting the P3Steel steel frame parts is practically unavoidable, whether you have a stainless steel or carbon steel frame. This step precedes the actual assembly of the frame and takes longer than putting together the basic P3Steel frame.
Painting proceeds in four steps:
1. File away all barbs leftover from the laser-cutting process.
2. Sand all the parts with 150 grit sandpaper.
3. Wash all the parts with warm water and detergent, rubbing with a sponge to remove all oil and metal dust residues. Dry with a rag and leave to finish drying for at least two hours.
4. Apply one or two (or three, or four…) as thin as possible coats of paint with a 24 hour interval between coats. Note that using excessive paint will change the tolerances in the frame and can make assembly much more difficult. Use as little paint as possible while still getting good coverage.
Videos
The x-axis parts

The x-axis assembled
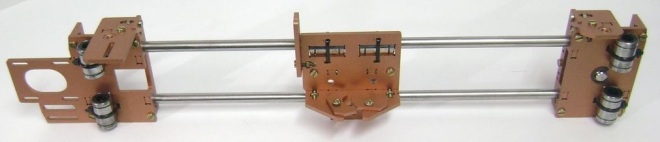
A good, simple and easy to understand animation of the assembly of the X axis arm assembly: Prusa i3 Steel Cordobesa – Guía de armado
The assembly of the frame. This frame has a mounting for the bowden extruder in the Z axis frame: I3 Steel CORDOBESA con extrusor/with extruder. I found this video very useful for the Polish variant that I have purchased (Frame Prusa I3 P3Steel v4.0 +RODS)
Prusa i3 Steel PSIQUE – Montaje completo impresora 3D
Another good, simple and easy to understand animation of the assembly of the v.1/v.2.x P3Steel, Montaje Prusa i3 3mm Steel diseñada por Irobri
Notes:
- Logical mistakes: When connecting the triangle parts as shown @ 0:21 to the main frame, it is not possible to mount the top parts (@ 0:24).
- Biggest mistake: The large triangles cannot be mounted as shown @ 0:28. This only can be done by a little bit bending AT THE VERY BEGINNING! If you do it like shown in this video, You start over again.
- @ 0:44 there moves a small Y belt holder to the slider table. There are two of those.
- @ 0:50 it is not possible to see, where the long thin part belongs, because it is covered by the red heating bed, which moves at the same time.
How to assemble the x idler pulley, on plastic x axis sub-assembly – RepRap Vision 3D Printer Idler Pully
PDF guides
- manual_p3steel_xl – this is a fairly good guide, which was pointed to by my supplier (Frame Prusa I3 P3Steel v4.0 +RODS), except it omits one part and its correct orientation in the frame, see Orientation of long thin rod on P3Steel v4:
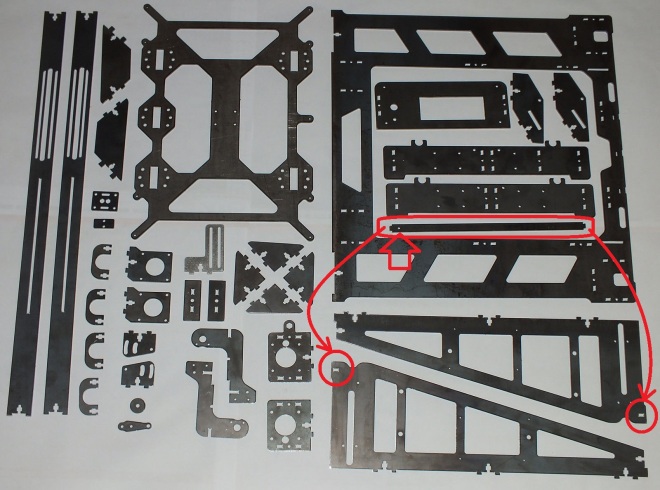
Photo guide
From googledrive:


Photos of the frame parts


After work
After building the printer, it is worth remembering that dangerous fumes are given off, as covered here, What are the best air filtration options for enclosures?, so as well as building an enclosure (which will also help keep the printer clean and free of dust, as well as preserving heat) the following link has a good design for a filter ABS 3d Printer Nanoparticle and Chemical Exhaust Air Filter:
ABS 3d Printer Nanoparticle and Chemical Exhaust Air Filter
Download: Exhaust air Filter for 3d Printer downloadable stl file
Price: 0 BTC
Item Number: 140629194058Description
Enclose your 3d printer and use this exhaust air filter along with a recirculating air filter to eliminate nanoparticles and chemical fumes. 95 to 99.5% of partilces up to 0.1 micron in size are filtered before air is exhausted into your 3d printing room. This is 3 times better than HEPA filtration. Chemical fumes such as phenols, hydrogen bromide, hydrogen cyanide, and styrene are also filtered out. The amount of chemicals filtered out depends on the amount of carbon filtration media you put into the unit and the strength of the fan you install on the unit. If you are using this for business purposes, you’ll have to experiment a bit to have it pass inspection. If you are using it for personal purposes, know that the human nose is extremely sensitive. People who have the gene for hydrogen cyanide detection can smell it down to a concentration of 2 to 10 ppm. Suffice it to say, that if you can smell no evil, you are probably not experiencing evil. This has totally cleared my 3d printing room of nasty fumes. I invite you to try it out for yourself as the cost is very low since I’ve designed it to use surgical masks and aquarium activated carbon filtration media, which is very affordable. You should change the filtration media and surgical mask every month or 50 hours of printing, whichever comes first. I offer no warranty of any kind as this is an experimental device.Instruction
Print it out at 0.27 mm layer height z resolution. If you use a standard fan, just use 5 mm of carbon filtration media. If you use a stronger fan, you may use a bit more filtration media. The more filtration media you use, the lower the air flow, the higher the temperature inside the enclosure. Put a thermometer inside the enclosure to monitor the temperature. Optimum temperature should be 100 to 120 degrees Fahrenheit. Filtration media goes on the mesh and the surgical mask goes under the mesh of the top piece. Tape the mask to the top piece. Insert the top piece into the bottom piece. Tape the top and bottom pieces together. Screw the fan on to the outside of the enclosure. Screw the bottom piece on to the fan. Enjoy!Bill of Materials
Forum
Discussion on exhaust air filter for ABS 3d printersMaturity
Final Finished DesignAuthor
tomasrey88Pedigree
This is an original design.License
You are free to share, remix, and make commercial use of ABS 3d Printer Nanoparticle and Chemical Exhaust Air Filter under the following conditions;
- You must attribute ABS 3d Printer Nanoparticle and Chemical Exhaust Air Filter to tomasrey88 using a link to http://www.3dprintfilemarket.com.
- If you alter, transform, or build upon ABS 3d Printer Nanoparticle and Chemical Exhaust Air Filter, you may distribute the resulting work only on 3dprintfilemarket.com, other websites and apps of Eagle Internet Education Inc.
- If you share or make commercial use of ABS 3d Printer Nanoparticle and Chemical Exhaust Air Filter, you may distribute the work only on 3dprintfilemarket.com, other websites and apps of Eagle Internet Education, Inc.
- Any of the above conditions can be waived if you get permission from tomasrey88.
Keywords
3d,printer,abs,air,filter,hepa,exhaustDonations/Tips in Bitcoin


Hi I’m Alvaro the designer of the V4 you got the assembly manuals on my website, just in case you want to add that info 😉
LikeLiked by 1 person